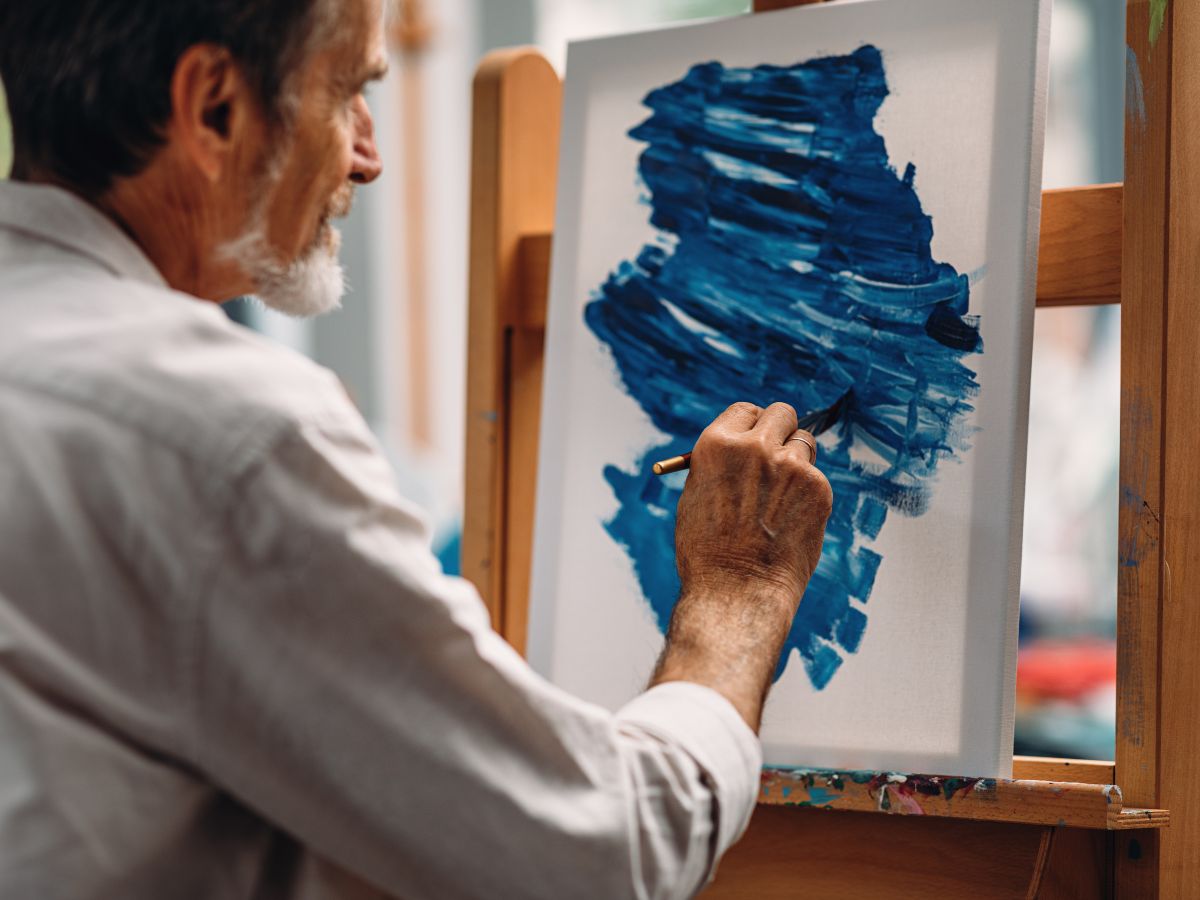
Tagged: canvas

Best Restaurants for Art Lovers

casa_lever

Dining establishments are now incorporating art in their décor to showcase their collections and to also entice customers. Aside from offering delicious food, these restaurants and cafés also serve as art galleries, displaying paintings on canvas, sculptures, and other artworks. If you’re an artist, or an art lover, check out these restaurants:

Casa Lever, New York. Casa Lever is a fine dining restaurant in Manhattan which displays modern art. Several portraits of celebrities created by Andy Warhol grace the walls of this restaurant. The portraits include Sylvester Stallone, Aretha Franklin, and Giorgio Armani.

Four Seasons Restaurant, New York. Four Seasons Restaurant displays changing galleries of Modern Art, including artworks from Andy Warhol, Jackson Pollock, and Helen Frankenthaler. There’s an interesting story about American artist Mark Rothko. Rothko was commissioned to create a series paintings for the dining rooms. He created the paintings with “malicious intentions” but then decided to return the advance payment and kept his paintings for himself.

The Leopard at des Artistes, New York. The Leopard is an Italian fine dining restaurant in New York. The dining area displays the six panels of wood nypmhs and paintings by American artist Howard Chandler Christy which includes The Parrot Girl, The Swing Girl, and  Fountain of Youth.

Tru, Chicago. The interiors of Tru looks like an art gallery, with its high ceilings, pin-spot lights, and white walls. It displays pieces from some of the best 20th century artists such as the King of the Pop Artists Andy Warhol, American geometric painter Peter Halley, and German abstract painter Gerhard Richter.

L’Escargot, London. Opened in 1927, L’Escargot houses an extensive collection of original artworks by some of the famous artists in the 20th century such as French painter Henri Matisse, English painter David Hockney, Spanish painter & sculptor Joan Miró, and Russian artist Marc Chagall.

Maxim’s, Paris. Maxim’s is famous for its Art Nouveau interior decor. It displays an extensive collection of illustrious masterpieces from the Belle Epoch. Maxim’s display more than 500 original, signed pieces from all over the world.

La Colombe d’Or, St. Paul de Vence, France. La Colombe d’Or is a hotel and restaurant located in an old medieval town in France. Paul Roux started it as a café bar in 1920 and then later opened an inn which attracted artists from neighbor towns. Many paintings now grace the walls of the restaurant since artists such as Pablo Picasso and Henri Matisse who were frequent customers exchanged their works as payment for meals or their stay.

Image source: www.casalever.com

Stuck in a Rut? 5 Ways to Get Inspired to Paint

inspiration

There are times in an artist’s life when he feels uninspired, unmotivated, and uncreative. It’s like there’s a creative lull, especially after finishing a major artwork. You feel like you’ll never be able to create another beautiful painting again, you’re tired of picking up your paintbrush and starting your first stroke on the canvas, you have no inspiration to work on. If you are in this phase, here are some ways which can help you get out of the creative block you’re experiencing.

1. Look around you to get inspiration. Get out of your studio and take a walk. Be conscious of your surroundings. Notice the things around you. Look with a fresh new perspective of your environment. Sometimes, because an object, a person, or an event is ordinary to you, you may not take notice of it. You’ll be surprised how simple, ordinary things around you can give you inspiration on your next painting. You’ll be able to express yourself more accurately if your subject is something which you can relate to, or something that you are familiar with.

2. Work on more than one painting at a time. This technique seems absurd. You are uncreative yet I’m suggesting you to work on two paintings. A painting, especially if it’s big-scale, can drain your creative juices in the long run. Working on the same project everyday can be a bit tiresome and tedious. To sort of “spice up” your painting sessions, try doing two paintings. If you’re finished with an area or element in the first painting and you’re feeling tired, you can then switch to the second painting. This allows you to rest your mind from the first painting and when you come back to it, you will see areas which you can improve and enhance.

3. Experiment with a different painting technique or medium. Humans are creatures of habit. We want to do the same things in the same way. If you’re feeling uninspired, try to create a new habit in painting. Learn a new painting style and start using it. This may be a trial and error exercise for you but as you go along, you’ll improve and hopefully, master this new painting style. It can even be your new signature style in your paintings. If you’re always working with oil paints, try using watercolors or pastels. Different media require different treatments, brush strokes, and handling. You may have to learn more about a new medium that you want to work on and studying about it may give you the motivation to start painting again.

4. Look at the artworks of other painters. Art galleries, museums, and art exhibitions showcase numerous paintings and other artworks. Seeing the creativity of other artists can also inspire you to do your own masterpiece. Look at the Internet for paintings done by famous artists and see if you can learn a thing or two about how use the same painting technique or materials in your own project. Check out art magazines to see what subjects are popular nowadays, who are the upcoming artists, or where you can get art lessons.

5. Meet with other artists. Get together with your art friends. If all of you are busy, schedule an appointment that all of you will keep. This is when you can share your ideas, frustrations, tips, problems, etc. Discussing with your art buddies can help you get fresh ideas, be motivated and refreshed. After a lunch or coffee with friends, you may find yourself filled with enthusiasm and eagerness to create another beautiful artwork.

Image source: www.thecreativecomplex.com

5 Tips in Buying an Artist’s Easel

311px-Tripod_easelIn a previous blog post, I explained the different types of easels available to painters. With a wide range of easels out there, how do you choose the easel for you? Here are tips to help you in selecting the perfect easel:

Tip #1. Ask these questions to yourself:

  • What kind of painting do I always do?
  • What medium am I using?
  • What is my budget for an easel?
  • Where will I place and store the easel? Do I have adequate space?
  • Where do I usually do my paintings? Inside a studio or outdoors?

Your answers to these questions will help you decide on which easel is best for you. A tabletop easel is best if you like to paint small-scale paintings or you have very limited space in your room. Different medium require different easels. For example, if you paint with oils, use an A-frame or H-frame easel, or whatever easel that will provide you with a vertical working surface. If you use several medium such as oils and watercolors, a convertible easel is best. Aside from these factors, the budget and space should also be considered.

Tip #2. Check the sturdiness of the easel. The easel should be sturdy enough to hold your canvas, support the painting process, and will not easily topple. The larger the canvas you’re working on, the sturdier the easel should be. You wouldn’t want to work on a shaky surface wherein each brush strokes vibrate because the easel cannot give ample support. Make sure that you’re not buying a display easel which is lightweight and spindly. It is designed for showcasing paintings, and not for working on paintings.

Tip #3. Choose an easel that offers adjustability. Buy an easel which provides the greatest degree of adjustability. When painting, you may want to paint standing up or sitting down, you need to work on top of the canvas as well as at the bottom. You need to have an easel that can be adjusted to give you the right tilt so you can paint on different areas of the canvas.

Tip #4. Look for an easy-to-use easel. This tip is related to Tip #3. Check if you can easily use the screw and bolt mechanism of the easel. See if it tightens properly according to the height and angle you preferred.

Tip #5. Save money for a quality easel. Keep in mind that an easel is one of your biggest expense in painting. You may have to wait for some time and keep saving for a high quality easel rather than buying cheap easels. You will be using an easel for a long time so it’s better to buy an easel that would last.

Tips in Painting on Large Canvases

Spolarium_Luna
The Spoliarium by Juan Luna, 1884. It measures 4.22 meters x 7.675 meters.

Many artists dream of painting on a bigger canvas. If you have an idea or inspiration that cannot be captured on standard size canvases, going big is your way to go. However, if you’ve never painted on a large canvas, you can be intimidated and overwhelmed with the thought of creating big-scale art. Here are some tips that can help you overcome your fears on painting big.

Tip #1. Gradually paint on bigger canvases. Help your mind, eyes, and hands to adjust painting on a large canvas. Every couple of weeks or so, try to paint on a canvas which is bigger than the previous one you used. This practice will help you get comfortable and get used to painting big. With a small canvas, you’re working on a limited space so the details are smaller, lines are finer, and you finish quicker than painting on large-scale canvases so, you may have to practice your brush strokes little by little until you reach your desired canvas size. Learn from your mistakes and correct them along the way. Don’t be in a rush to work on a large canvas.

Tip #2. Know the scale of the painting. Are you using a big canvas to fill it with small details of a complex subject (e.g. historical event) or are you painting a big-scale of a small subject (e.g. portrait, nature). Find the balance among the subject, the size of the canvas, and your painting style. Remember, just because the painting is bigger, doesn’t mean it’s better than ordinary size painting. Some subjects are perfect for larger canvases while some are best with small canvases.

Tip #3. Use bigger brushes. Bigger brushes will help you finish the painting faster. You can cover larger areas of the canvas and you can loosen up a bit when painting, like a child painting freely on the wall. Stand back from the canvas and see if you’re on the right track.  You can still use small brushes, though, if you’re more comfortable with them and if the style of your painting requires them.

Tip #4. Divide the canvas into sections. Working on a big painting can be overwhelming. Using your sketch as guide, try to divide the canvas into sections and do one section at a time until you finish the whole painting. You can also try breaking down the elements of the painting and before you know it, you’re on your last brush strokes in this painting.

Tip #5. Be patient. Since you’re painting on a large canvas, naturally, it will take more time to finish and to dry, so be patient. If you’re an artist who get bored easily or can’t delay gratification, then creating large-scale paintings is not for you.

Image source: www.wikipedia.org

Dutch Master Rembrandt and His Most Famous Works

485px-Rembrandt_Harmensz._van_Rijn_135

Today is Rembrandt’s 407th birthday!

Born Rembrant Harmenszoon van Rijn in 1606, he is the most celebrated Dutch artist and is considered as one of the greatest painters in European art history. Most of his masterpieces are self-portraits, portraits of other artists, and depictions of religious and historical themes. Art experts claim that Rembrandt was able to create more than 600 paintings, 400 etchings, and 2,000 drawings, but these figures are not certain.

Here are some of Rembrandt’s most famous works:

The Return of the Prodigal Son. This is an oil on canvas painting finished circa 1669. It is one of Rembrandt’s final works. The Return of the Prodigal Son depicts a parable from the Bible about a prodigal son returning to his father after wasting his inheritance. In the painting, you’ll notice the ragged state of the son’s clothing, kneeling and repentant in front of his father who was garbed in rich clothing. The expressive lighting and coloring in the painting effectively evoke repentance, compassion, and forgiveness.

The Anatomy Lesson of Dr. Nicolaes Tulp. Rembrandt was commissioned to paint this group portrait, The Anatomy Lesson of Dr. Nicolaes Tulp. The painting portrays a group of surgeons, surrounding a table while studying a corpse. Specialists have commended Rembrandt for the accuracy of the muscles and tendons of the corpse’ dissected arm. Rembrandt was 26 when he created this painting. The painting is displayed in the Mauritshuis museum in The Hague, the Netherlands.

The Return of the Prodigal Son by Rembrandt, c. 1669.

Danaë. Rembrandt portrayed Danaë, the mother of Perseus in Greek mythology. The 1636 painting shows his interpretation of the myth where Danaë waits for Zeus who impregnated her. It is a life-size painting, measuring 185 cm × 203 cm. Danaë is housed in the Hermitage Museum, St. Petersburg, Russia.

Jacob de Gheyn III. Jacob de Gheyn III is a portrait of one of Rembrandt’s contemporaries who was a Dutch Golden engraver. The painting measures 29.9 x 24.9 centimeters and because of its small size, it has been stolen four times since 1966. It is called “takeaway Rembrandt” due to the numerous theft incidents, the most recorded of any painting.

Belshazzar’s Feast. Belshazzar’s Feast is a 1635 painting portraying the Biblical story of Belshazzar and the writing on the wall. The setting is at a banquet wherein the characters show alarm, surprise, and amazement as they look at the handwriting on the wall. Rembrandt effectively used the technique called Chiaroscuro, wherein he manipulated light and shadow to give contrast and create volume and give a three-dimensional effect on objects.

The Night Watch. The Night Watch is the best known painting housed in the Rijksmuseum, Amsterdam, the Netherlands. The painting was commissioned by Captain Frans Banning Cocq who was one of the main characters in the artwork. It is widely known for its size (11.91 ft × 14.34 ft), effective use of Chiaroscuro, and perception of motion.

Image source: www.wikipedia.org

Types of Stretcher Bars

Stretcher bars play a major role in the appearance of a canvas artwork or Giclee printing. The quality of wood and the structure of the stretcher are the key to easy stretching which produces a better print quality and longer life for a canvas. It is also important that you choose the right stretcher for your canvas depending on the type of canvas you will use, the size of your artwork and weight and texture of the weave of the canvas. The following are the types of stretcher bars and their uses.

stretchers

Medium/Standard Duty
Medium duty stretcher bars are the standard stretcher bars with raised and rounded edges which significantly reduce the friction of stretching. It provides a tighter and more even canvas face. It also reduces the stress placed on the canvas and the person doing the stretching, as pliers lever the canvas around the frame.

Light Duty
Light duty stretcher bars are great for those smaller paintings or giclee prints that will be framed or won’t benefit from a thicker bar. They have a beaded (rounded) edge that holds the canvas and flat part of the bar slightly apart. The rounded edge greatly relieves the stress on the canvas and person framing. A tighter, more uniform stretch is the result of this feature because the canvas flows around the smooth edge.

Medium/Heavy Duty- Goldilocks
Goldilocks medium or heavy duty stretcher bar is an expensive option because it is in demand for those who require a substantial side profile for their valuable art work. It adds to the intrinsic value of the art without having to spend more. This stretcher profile is frequently used for the stretching of giclee and other prints.

800px-Light_stretcher_bars_assembled_disassembled_051907

Heavy Duty-Midi
Heavy duty Midi bars offer you an exceptional quality at a very reasonable price. Like all other gallery wrap stretcher bars, their edges are created to impart a smoother stretching with less resistance. These light-weight bars are also perfect for reducing the overall weight of the frame. Straight-grained and lightweight these bars are perfect for also reducing the overall weight of the frame.

Super Heavy Duty
The super heavy duty gallery wrap stretcher bars are known for their impressive mass as well as strength. It is very useful when you have to stretch that large canvases and paintings. It is also ideal for smaller frame applications where very high tension is required. They are usually made with a brace at the back for added strength.

Image source: commons.wikimedia.org

How Stretcher Bars Are Made

www.canvaslot.com
www.canvaslot.com

A stretcher bar is a wooden frame that is used as wooden framework support (usually made from pine) on which an artist fastens a piece of canvas. It provides a steady tension to the canvas and gets the canvas artwork very flat and taut on the frame base, and thus makes it ready to be placed in a picture frame or to simply hang it as is. A stretcher can be bought ready-made as four parts that you just fit together, or you can just buy a pre-stretched canvas at canvaslot.com or you can just do it yourself. Here’s how.

Materials:
• 1×2 inches (2.5-by-5.1 cm) wood (4 pieces)
• Hand saw or power tools
• Miter block
• Staple gun
• quarter-round trim (4 pieces)
• Pencil
• Hammer
• Headless nails (not longer than the width of your quarter-round and 1×2 inch wood combined)

Step 1– Choose the type of wood you want to use. The sides should measure 1 by 2 inches (2.5 by 5.1 cm). Measure the wood according to the desired dimensions then cut with a forty-five degree angle at each end. You can use a miter box to make good, equal, 45 degree cuts at each end so that the wood fits together properly at the corners.

PinFrame-3-Marking-2nd-Cut

Step 2– Bring together the edges of the cut wood on a flat surface and use powered staple gun to secure the corners by placing 3 staples over the line where the corners come together. Staple the rest of the corners and do this on both front and back of the joints to make the entire frame become very strong and rigid.

PinFrames-11-Stapling

Step 3– Cut the trim pieces with whatever tool you used on the other pieces of wood. Place one flat side of the quarter-round against the stretcher bars, and the other flat side facing outward. The curved edge of the quarter-rounds should be facing inward toward the center of the frame. The purpose of the quarter-round pieces is to raise the canvas off of the stretcher bars. To secure the trims to the frame, nail them with headless nails. Do this by spacing the nails at 4-inch (10.2-cm) intervals to keep it solidly in place.

38IMG_0013

When the entire frame is finished, it’s time to start stretching the canvas. By stretching your own canvas, you can not only save money, but get something you’re willing to experiment on. You also get a canvas that’s exactly the size you’re after.

Image source: www.younghouselove.com

Types of Painting Easels: An Introduction

311px-Tripod_easel
A-frame easel

Dictionary.com defines easel as “a stand or frame for supporting or displaying at an angle an artist’s canvas.” Easels are usually made of wood, steel, or aluminum and are available in different designs. Here are the different types of easels in the market:

1. A-frame or Lyre easel. The A-frame easel has a tripod design, meaning, two legs in front and one in the back. It provides a strong base  for your painting and it’s small size makes it easy to move and store in your studio. The legs are collapsible so you can just fold the legs and keep it in your storage when you’re done painting. If you have a small space, an A-frame easel is perfect since it will not crowd your studio. A-frame easels can hold small size canvases up to 75″ canvases.

2. H-frame easel. As the name suggests, an H-frame easel looks like the letter “H.” It has parallel vertical posts and a horizontal crossbar support. It gives sturdier support compared to A-frame easel but it’s quite bulky. An H-frame easel can hold bigger canvases, up to 84″-96″.

3. Single mast easel. The single mast easel is the simplest type of easel. It doesn’t offer the same support as the A-frame and H-frame easels but because of its affordability, many art students and beginners opt to use it. It occupies less space (great for small apartments and school studios), is collapsible, and easy to store.

4. Giant easel. The giant easel is made for artists doing large-scale paintings. It can handle canvases taller than 8 ft so naturally, this easel is stronger and sturdier. Due to its weight, transporting a giant easel is not easy. If you are consistently working on large-scale paintings, use a giant easel but make sure that you have a dedicated studio where you can use and store it.

5. Convertible easel. The convertible easel, also called hybrid easel, is the most versatile among all other easels. You can position your canvas horizontally or vertically, depending on the surface needed by the medium you’re using. This easel can accommodate the needs of painters using oil, acrylics, watercolor, and pastels. If you’re an artist who uses several media, the convertible easel is best for you.

6. Table top easel. The table top easel can be placed on a table and allows the artist to sit while painting. It is great for those who work on small-scale paintings and those who have limited space in their room or studio. It is portable and stores easily.

7. Plein air easel. The plein air easel is the easel that you can use outdoors. It has tripod legs and can have drawers and shelf to hold your painting supplies and materials. It can hold canvases up to 45″-78″ high.

8. Bench easel. The bench easel combines an easel and a bench. The design allows you to sit while painting. It is collapsible so you can bring it anywhere. It is great for plein air artists, art teachers, or for those giving demonstrations.

9. Display easel. The display easel is not for painting, just for displaying paintings only. It is made of lighter material so it cannot hold heavy artworks. Use the display easel when you are having an art show or any event where you need to showcase your work.

10. Children’s easel. The children’s easel is created for kids. It is adjustable and most designs have two sides, allowing a couple of children to work on their paintings.  It offers built-in storage where children can keep their art supplies.

Image source: www.wikipedia.org

Guidelines for Artists in Packaging Paintings for Shipment

shipping-blank-canvases

Transporting artworks is part of an artist’s life. If you have an out-of-town exhibition or seminar, running an art business, or selling and collecting paintings, shipping paintings is very important. Shipping paintings can be a bit risky. Paintings are delicate and you must take utmost care in packaging, and handling them.

Here are some guidelines to help you in packaging paintings. Note that, despite best efforts, there are still some uncontrollable factors such as bad weather, untrained art handlers, rough roads, etc. that could damage your paintings while in transit. These guidelines will help you send your paintings safely and lessen the damage (if any).


Before shipping
1. Assess your shipping needs. Know the size, medium, and condition of the painting. Fragile, old, or antiquated paintings will be more damaged when shipped so it’s better to transport paintings which are less fragile. But, if you really need to ship a painting that is fragile, you have to take a different approach in packing and shipping it.

2. Consider the distance the painting has to travel. The farther the painting has to move, the more vulnerable to damage it gets. When the painting has to be shipped in great distances, remember that many handlers will be in between Point A to B.

3. Decide which transportation is best to use in moving your painting. Can you move your painting by hand, by car, by truck, or by plane?

4. If you will need a shipping company, search for a trustworthy company and determine the policies, restrictions, and cost of their service.

Packaging
Packaging your painting by yourself can save you money, if done correctly and with the right supplies. Here are the steps:

1. Make sure you have these packing supplies on hand, especially if you’re running an art business.

  • Boxes
  • Palette tape & wrap
  • Cardboard pads
  • Bubble wrap
  • Packing tape
  • “Fragile” stickers

2. Measure the dimensions of the painting. Give a 2″ allowance all around the piece which will serve as a buffer against the outside world.

3. Starting from the back of the canvas, wrap the palette wrap tightly around the painting and cover the entire surface.

4. Cut small slits on the plastic at the back of the painting to let the piece “breathe.”

5. Put the cardboard padding on the table. Place the painting on top of the cardboard padding and measure the width and depth of the painting. Double these measurements and add few more inches if you want and mark these on the cardboard.

6. Cut the cardboard using the measurements. Create a second box using the cardboard padding. Put the painting inside and secure the box with the packing tape.

7. Tightly wrap the bubble wrap around the second box. Tip: Put another layer of bubble wrap on the edges of the box as extra cushion since the edges of the painting or the frame are more prone to damage when shipping.

8. Put the bubble-wrapped second box into the outer box. Fill any spaces with additional bubble wrap. If there are a lot of extra spaces, you can opt to cut the outer box to fit the second box.

How to Use Gesso on a Canvas

acrylic_gesso

Gesso? What is it?

Most beginners in painting may be unfamiliar with the word “gesso.” It’s a highfaluting term that could leave a novice dumbfounded. But, don’t fret. In this post, I’ll try to shed light on this and hopefully, we can understand what gesso is all about.

Encyclopaedia Britannica defines gesso (pronounced ‘jesso’) as:

“a fluid white coating, composed of plaster of paris, chalk, gypsum, or other whiting mixed with glue, applied to smooth surfaces such as wood panels, plaster, stone, or canvas to provide the ground for tempera and oil painting or for gilding and painting carved furniture and picture frames.”

Basically, gesso is a substance used to prepare or prime a canvas before you can use it in painting. It was traditionally used by oil painters so the oil paints would adhere to the canvas. Gesso is used to protect the canvas fibers, smoothen the surface, and give flexibility to the canvas.

Is there a difference between an oil gesso and an acrylic gesso? Yes, their ingredients. Traditional oil gesso, also called glue gesso, contains an animal glue binder (usually rabbit-skin glue), chalk, and white pigment. Acrylic gesso is made of an acrylic polymer medium (binder), Calcium carbonate (chalk), a pigment (Titanium white), and chemicals for flexibility and longer life.

Acrylic gesso doesn’t contain glue since acrylic paints is not corrosive, unlike oils. The glue in the glue gesso is absorbed by the fibers of the canvas which protects it from the corrosive nature of oil paints. Many artists use acrylic gesso because of its versatility, quick drying time, convenience, flexibility, and ease of use. Some artists claim that it can be used as ground when painting in oil but some argue that the flexibility of the acrylic gesso will cause the oil paint to crack over time.

An acrylic painter could choose not to use acrylic gesso if he wants the staining effect of acrylic paints on canvas. For beginners, it’s better to prime the canvas first, or use a pre-primed canvas since you are still practicing your painting skills. CanvasLot offers pre-primed canvas in various sizes so you won’t go into the trouble of priming your canvas.

If you are a beginner in oil painting, you can use acrylic gesso but just make sure that the canvas has been properly sized. If you are creating a portrait, or planning to create a masterpiece or something like an heirloom to your family, it’s better to use the oil gesso since the oil paint will stick better to it than to an acrylic.

You can buy acrylic gesso in most art supplies shops and it is available in artist quality and student quality. As with other art supplies, the artist quality acrylic gesso is more expensive and has higher quality than the student gesso. For priming a canvas, use the artist quality gesso.

Image source: www.wikipedia.org