Different Types of Brushes in Oil Painting
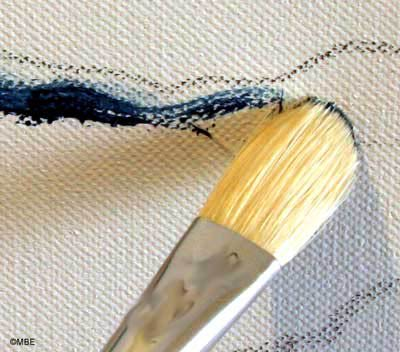
Aside from canvas, paintbrush is one of the most important material an artist has to have. You have to have good brushes with you to create good paintings. Even a good painter cannot come up with wonderful pieces is he’s using bad brushes so make sure you have good brushes with you. For oil painting, a good brush will retain its shape when dipped in paint, will bend in each stroke, and return to its original shape after each brush stroke.
Brush Hair
Oil painting brushes are available in bristle and sable hairs. Bristle brushes come from pigs’ hair and are used to begin a painting. The bristles are strong and the tips are naturally split, allowing the brush to hold more paint. Use bristle brushes which are half an inch wide or wider. Sable brushes are soft-haired brushes made from the hair of the tail of a sable marten which are a bit expensive. These brushes are perfect for painting details and small areas.
There are also brushes using synthetic hairs which are also cheaper than brushes with natural hair. If you are against using animals in your art, use synthetic brushes for your peace of mind.
Brush Shapes
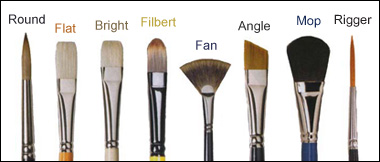
Brushes come in different shapes. The most common shapes are: Flats, Filberts, Brights, and Rounds. Other shapes are the Fan, Angle, Mop, and Rigger. Each brush is used for a variety of techniques in applying paint.
Flat brush. A flat brush has long bristles arranged in a rectangular shape. It is a primary blending brush and used for spreading paint quickly and evenly on a canvas. It is considered as the most versatile among the brushes.
Filberts. A Filbert is a flat brush with an oval shape. It is used in blending and creating areas with softer edges. Many artists have advised on using filberts with natural hairs since the hairs stick together better when wet.
Brights. Brights are flat brushes but with shorter and stiff hairs than flats. Use this brush if you want your strokes to show in the painting. It is used in thinner painting styles and also, thicker applications of paint such as impasto.
Rounds. Rounds are brushes with a pointed tip which provides little variation in the size and shape of the brush stroke. It is used for painting small details and line work.
Fan. As the name suggests, a Fan brush is shaped like a fan. It is used in blending large areas, creating soft blends of several colors. It can also be used to soften brush strokes on the canvas.
Angle. Angle brushes have short bristles and longer ones at one end, creating an angular shape. It can be used for general application of paint as well as detail work.
Mop. Mop is a large brush with a rounded edge. Larger sized Mops look like a blush-on brush which are great in broad soft paint application.
Rigger. A Rigger is a round brush with long hairs used in painting delicate lines and dots.
Image source: www.emptyeasel.com


, 1948")