Category: Tips

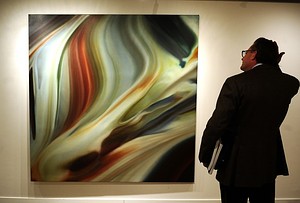
Tips on How to Understand Abstract Art

Interpreting an abstract art doesn’t have to be so complicated. Just like interpreting more realistic paintings, there is no fixed right or wrong way to look at it or understand it. . Here are some tips that you can take into account when viewing abstract art.

Claudie-Bastide-2
Abstract art by Claudie Bastide www.claudiebastide.wordpress.com

Create a connection with the art. The artist has probably carefully considered your role as the viewer of the painting and wants it to speak to you on some level. The connections you make with a piece of abstract art may discover a whole new meaning. Artists are open to hear what different viewers uncover in dialogue with their artwork, even if it’s nowhere near the artist’s original idea. Just the thought of allowing yourself to be taken in by their painting will make them feel satisfied with their art.
Do not try to interpret abstract art by looking at the title given to the work. This will more often than not confuse you even more because you will try to look for the title in the painting instead of looking for the concepts and other more important things that the art can offer. Try not to be influenced by the title then you will see that it is so much easier to understand it, irrespective of what its name suggests.

Abstract art by Brian Potter www.brianjpotter.com

Do not let other viewers to influence your interpretation when trying to figure out a piece of abstract art. This may lead you to believe that you do not ‘understand’ abstract art and you’ll try to modify your own interpretation. When seeing a work of abstract art, you have to see what the scene means to you and what emotions it evokes in your mind. It may not be the same as anyone else’s opinion, but this will be your unique interpretation of the work.
See it as more than a single, isolated creation: there must be a context to truly appreciate a work of art. Every painting is created within a particular environment, and if you do not understand that environment, you will never be able to appreciate what the artist has to offer you. This is why, when you study the work of a particular artist, it makes sense to learn something about his life and the culture in which he lived.
Do not focus on physical aspects of the art but instead try to see the energy, the darkness and brightness, and the shower of emotions that these things reflect and you will find that you finally ‘understand’ abstract art. Let your eyes play with the colors of the painting, slipping around the geometry, following the twirls, twists and turns, dipping in and out of the surface.

Image source: www.abstractartistgallery.org

5 Ways Artists Can Protect Themselves From Online Scams

art.computer.securityThe information age makes its easier for artists to introduce, promote, and sell their paintings using the Internet. Artists can use the services of numerous online art galleries and social media networks to establish their art business. They can also set up their own art website or art blog as platforms for their online business. The Internet makes it easier for artists to do business but unfortunately, there are scammers who also take advantage of technology. As an artist, you must protect yourself and prevent becoming a victim of art scams.

Ways to protect yourself against fraud:

1. Be skeptical. If you receive an email or an offer that’s too good to be true, it probably is. Artists are vulnerable to these scams because they are hungry for fame, excited to make that first sale, and eager to make connections in the business. Signs to look for in a scam email: wrong grammar and spelling of words, urgency to buy, and the so-called buyer insists on arranging the shipment of the painting. Check out the Internet for the lists of email scams, including popular scammer names and email addresses.

2. Establish strict rules on accepting check payments and money orders. To protect yourself, never accept postdated checks, third-party checks, and checks where the amount is more than the agreed upon price for the artwork. Don’t accept overpayment wherein you have to refund the excess amount. For money orders, request the buyer to send payment from a trusted, domestic bank.

2. Make sure the payment is correct and has been cleared. Do not ship the painting unless the check or money order has been cleared in your bank. It takes three weeks or longer before a bank clears checks and if the check you’ve deposited turned to be a counterfeit, your bank may charge penalty fees on you.

3. Protect all online transactions. Use a trustworthy online payment service such as PayPal which protects both you and the buyer. If you’re buying art online, see if the web address starts with “https” or has a padlock symbol. These signs mean that the website where you are placing payment is secure and financial information such as your credit card number is encrypted when it is sent.

4. Be vigilant against computer viruses, trojans, malware,etc. Use the latest anti-virus and anti-spyware programs and keep them updated. If a virus attacks your computer, it can lead losing all your files, including the commercial photos of your paintings. Activate the firewall to prevent online criminals from accessing your computer and getting vital information on your art business.

5. Report scams. If you’ve been a victim of fraud, report it to your State Attorney General’s Office of Consumer Affairs. You can also file a complaint with the Federal Trade Commission.

Image source: www.cnn.com

Guidelines for Artists in Packaging Paintings for Shipment

shipping-blank-canvases

Transporting artworks is part of an artist’s life. If you have an out-of-town exhibition or seminar, running an art business, or selling and collecting paintings, shipping paintings is very important. Shipping paintings can be a bit risky. Paintings are delicate and you must take utmost care in packaging, and handling them.

Here are some guidelines to help you in packaging paintings. Note that, despite best efforts, there are still some uncontrollable factors such as bad weather, untrained art handlers, rough roads, etc. that could damage your paintings while in transit. These guidelines will help you send your paintings safely and lessen the damage (if any).


Before shipping
1. Assess your shipping needs. Know the size, medium, and condition of the painting. Fragile, old, or antiquated paintings will be more damaged when shipped so it’s better to transport paintings which are less fragile. But, if you really need to ship a painting that is fragile, you have to take a different approach in packing and shipping it.

2. Consider the distance the painting has to travel. The farther the painting has to move, the more vulnerable to damage it gets. When the painting has to be shipped in great distances, remember that many handlers will be in between Point A to B.

3. Decide which transportation is best to use in moving your painting. Can you move your painting by hand, by car, by truck, or by plane?

4. If you will need a shipping company, search for a trustworthy company and determine the policies, restrictions, and cost of their service.

Packaging
Packaging your painting by yourself can save you money, if done correctly and with the right supplies. Here are the steps:

1. Make sure you have these packing supplies on hand, especially if you’re running an art business.

  • Boxes
  • Palette tape & wrap
  • Cardboard pads
  • Bubble wrap
  • Packing tape
  • “Fragile” stickers

2. Measure the dimensions of the painting. Give a 2″ allowance all around the piece which will serve as a buffer against the outside world.

3. Starting from the back of the canvas, wrap the palette wrap tightly around the painting and cover the entire surface.

4. Cut small slits on the plastic at the back of the painting to let the piece “breathe.”

5. Put the cardboard padding on the table. Place the painting on top of the cardboard padding and measure the width and depth of the painting. Double these measurements and add few more inches if you want and mark these on the cardboard.

6. Cut the cardboard using the measurements. Create a second box using the cardboard padding. Put the painting inside and secure the box with the packing tape.

7. Tightly wrap the bubble wrap around the second box. Tip: Put another layer of bubble wrap on the edges of the box as extra cushion since the edges of the painting or the frame are more prone to damage when shipping.

8. Put the bubble-wrapped second box into the outer box. Fill any spaces with additional bubble wrap. If there are a lot of extra spaces, you can opt to cut the outer box to fit the second box.

Tips for Caring and Handling Acrylic Paintings

Acrylic_care

Acrylic paints were introduced in the 1950s, much later than oils, but museums, galleries, and art collectors have included many acrylic paintings in their collections. Artists have experimented and used acrylics on canvas for its versatility of use and quick drying time. The properties of acrylic paints differ from oils so the maintenance and caring for acrylic paintings is different from oil paintings. Since acrylic paint is relatively new compared to oil paints which have been used in art for centuries, people are just starting to know its aging characteristics. For now, the best way to preserve and lengthen the life of acrylic paintings is by preventive care.

Here are the tips for caring and handling acrylic paintings:

Cleaning
Currently, there is no concrete guideline how to clean an acrylic painting. Below are just suggestions that you can do at the moment.

1. Use a clean towel or a feather duster and lightly remove the dirt on the surface of the painting. Acrylic paintings gather dust more easily than any other medium so you may have to dust them frequently.

2. If you want to keep off the dust, put the painting in a protective frame. Acrylic paintings have electrostatic charges on the surface which attracts dust and a protective frame will prevent dust from accumulating.

3. Don’t use water, soap, or household cleaners when cleaning acrylic paintings. Most cleaning agents have ammonia which can damage your painting. When you use cleaning sprays in your house, make sure that your acrylic painting is not nearby when you are cleaning to avoid excess droplets of the spray go to the paintings.

Maintenance

1. Keep acrylic paintings away from direct or extreme heat, cold, and humidity. Acrylic paint becomes soft around 60° so display your paintings far from ovens, stoves, heating lamps, or any other source of heat inside the room.

2. Don’t touch the surface of an acrylic painting. Your fingernail may accidentally leave a dent or put extra pressure on the painting which will lessen the value of the piece.

3. Mold growth is a common issue in acrylic paintings. There is no solution for it yet that would retain the original paint of the piece. The best way to lessen mold on the surface is to hang the painting in a room where there is less humidity.

Transporting

1. Put the acrylic painting in an effective packing case that would protect it from damage. According to this website, a packing case should be able to do the following:

  • Support the painting, insulation and cushioning foams
  • Protect the contents from impact and puncture without serious distortion
  • Maintain a sealed environment
  • Protect against intrusion of moisture
  • Provide handles for lifting and moving
  • Survive a multi-venue tour without compromise of any of the above functions

2. Include instructions for unpacking and repacking outside the container. The recipient may not know the proper way of unpacking the painting so proper instructions should be provided by the sender. These instructions are important especially if there is a dispute about any damage caused by shipping, unpacking, or repacking of the painting.

3. If you have to transport the painting by rolling it, here are tips:

  • Allow enough time for the painting to be completely cure.
  • Put a polyethylene plastic onto the surface of the painting before rolling.
  • Roll and unroll the painting at room temperature. A heated room will melt the paint while a cold room will cause cracking.
  • Roll the painting loosely and evenly to prevent adhesion or ferrotyping.
  • Once packed, secure the painting with a tape.

Image source: www.goldenpaints.com

Tips for the Maintenance and Handling of Oil Painting

maintenance_Evans
Maintenance by David Larson Evans, 2012.

Oil paintings, whether you created yourself, acquired from an auction or an heirloom, have much value. You have to take care of its maintenance, handling, and storage. Paintings last a long time and to lengthen its beauty and life, proper care must be given to them. Museums and art galleries spend a lot and they go at great lengths just to keep and safeguard their paintings. As a painter or as an art collector, you must know some information on the maintenance and correct handling of your pieces. Here are some tips:

1. Handle the oil painting by the frame. Don’t touch the painting surface to avoid leaving natural oils from your skin.

2. An oil painting canvas is pliable, so don’t put an object at the front and behind the painting which could press the painting and leave a dent, or worse, cause a tear. If there is damage in the painting, you could do your own repair but if the piece is an heirloom or has much value, it’s better to ask a professional art restorer to do the repair.

3. When transporting an oil painting, place cardboard or thin plywood on both sides of the painting and put bubble wrap around it to secure the painting. Don’t stack paintings on top of the other.

4. When you are permanently storing a painting, put it in a custom-sized plywood container and brace the painting to avoid movements. Don’t store the painting in your attic or basement since the environment in these rooms are not favorable for paintings.

5. Don’t expose your painting under direct or extreme sunlight, cold, or humidity. These conditions will cause the paint to fall off, weaken the canvas in time, and ultimately damage your painting.

6. The best place to “store” a painting is by displaying it on a wall. Paintings are created to be viewed and admired, not to be hidden under the basement. Hang it in a place without extreme temperatures. Don’t hang it near or across a window, fireplace, or any room with much humidity.

7. Don’t hang paintings in hallways or any room where there are lots of movements and where it can be knocked or scratched. The best room for a painting would be a room where people are comfortable, a room where the temperature is controlled, not much heat or cold. Keep your paintings away from fireplaces, heaters and radiators.

8. Use two hooks when hanging a painting to provide enough support and balance. The painting should be high for people to see but not too high to put a strain on the viewer’s neck. If you are hanging a painting in your living room, the best spot is above the sofa, above head height of anyone sitting.

9. Use a soft-bristled brush to dust the surface of the painting to prevent dust from accumulating.

Image source: http://www.dailypainters.com

How to Repair a Damaged Canvas

You’ve finally finished your masterpiece. After hours and days laboring on your painting, carefully putting your inspiration on canvas, you’re excited to display it. Unfortunately, you or someone else accidentally ripped a small area on your painting. What do you do?

Don’t panic. There are two ways to repair a torn, ripped, punctured, or damaged canvas: patching or lining. Before fixing your canvas, you have to consider some factors that would affect the end result of your repair. If the damage is small, patching would be a good remedy. Patching is a quick and easy solution to tiny punctures, L-shaped tears, and small tears. For damages affecting a large area or if the small tears are located in several areas, lining is the best way to fix the canvas. For old oil paintings, professional art restorers prefer to do lining since most aged canvas are brittle, fragile, and more susceptible to damage when not reinforced.

tear-canvas-repair

Patching
Here are the steps for patching a canvas:

1. Smooth out the area where the tear is located. Clean up any fibers that may have unraveled.

2. Cut a piece of canvas with at least an inch wider than the tear. If you have a lighter weight canvas than the one you’re repairing is best to use.

3. Glue the patch at the back of the tear. Use acrylic-gesso or an acid-free glue in patching. Apply a thin layer of glue to the patch. If you use too much glue, it will only squeeze out of the patch and get on the front of the canvas which will leave an unnecessary stain.

4. While the glue is still wet, check the tear at the front of the canvas. Use a pair of tweezers to put back loose threads in place. Carefully arrange the threads to fill the damage.

5. Inpaint the patched area, if needed. If it’s your own work, it would be easier to repaint the repaired area.

Tips:

  • Work with patience and care.
  • Hire a professional art conservator or restorer for fixing valuable and antique paintings. They can do a more refined repair of an old painting.
  • Patching done in a busy area of the painting is less noticeable than a patch in a solid area.
  • Just because the patch is located behind the canvas, doesn’t mean you will do a sloppy repair. Make the patch neat and professional-looking so if someone sees the repair, they won’t be dismayed with the whole painting.

Image source: http://painting.about.com

Where To Find Art Buyers?

Selling your art is no different from selling other items. All you need to do is to find the right people who want to buy them and the right places to display your art and make it look good, where art buyers tend to congregate, and places where you know the client can afford your asking prices. Here are some of the best places where you can find your buyers.

Galleries
Still, the best place to find a buyer for your artwork is in an art gallery. You can look around to find an art gallery exhibition and display your work. Find a good art gallery to represent you, and who can arrange an art show for you. Art buyers often show up at the opening just to see if there is anything that they like. There are always potential buyers who come to these exhibitions looking for good paintings.

"Ausschnitt (Kreutz)" by Gerhard Richter

Social Media and Art Websites

There are many social networks, online galleries, and other websites online to market art. There are by far too many to mention here, but the major ones are Facebook, Google+, Twitter, and many online gallery websites. Sign up and start advertising online. If you manage to sell many, you are not only making money, but are receiving free advertising! People will be talking about your art, or share it through the mail. Many will see your artworks, who would not have been able to before.

Art competions, Auction sale and Art Expos
Try to join as frequent as possible in competitions and art events. Even if you do not win, you and your artwork will get exposure. Whoever is on the judging panel will see it, be it gallery owners or curators. The more they have to judge your artworks the more they will be familiar with you and know how serious you are about your art career. Its usually best to show alongside other artists who work in the same style as you. That way, the art buyers that often buy from them, may purchase artworks from you.

300x2367

Neighbors, Family and Friends
Of course, the first people who have to see your artwork are the ones who are nearest to you. Show them what you are creating. Show them to your family members, friends and you neighbours. . Even if they do not buy artwork from you, they may tell others about your creations.

It’s best to never pressure someone into buying though. If they like it, or can afford it, they will most likely purchase from you without any convincing. Observe how art is sold in as many different circumstances as possible. Watch how people sell at all types of galleries, art shows, art fairs and other venues where art is for sale. See what sales techniques work to different kinds of buyers and take note which one doesn’t. Research on what sells best and why and learn everything you can from gallery owners and fellow artists about how they present, market, and sell art to clients.

Image source: www.forbes.com

Learn the Oil Painting Technique: Wet into Wet

Also known as Alla Prima (Italian for first attempt), wet-on-wet means you simply paint over wet paint. The goal in this technique is to finish the whole painting before the first paint dries therefore working fast is the key. Here are some things that you need to know about wet-on-wet painting.

morris hinson1

• You start the wet-on-wet technique using thinned oil paint for drawing. Then you place spots of colors all over the painting to fill it in because the sketch usually dissolved or over-painted as the painting progresses. The painting can be adjusted slightly with glazes and highlights after it dries.

• Blending colors is easy with wet on wet technique. You can directly place one color onto your canvas, and then add other colors and blend with brush or knife to you desired shade. But you have to make sure that you mix colors rapidly and with clear understanding of color theory and keeping in mind the form that you’re trying paint. Expertise with brushwork is very important to do the trick.

• The beauty of wet-on-wet technique is that it sustains the fresh and spontaneous inspiration that come as you paint. For me it is the most intuitive way to paint. Creating a portrait with the technique will require expertise in mixing colors to match your subject.

• It may require few layers of paint to complete the painting, in which case it is easy to overfix the paints, which can look labored and weak. This is the stage where many beginners give up, but if you press on, you can master wet-on-wet technique and create works with the amazing freshness and spontaneity that only wet on wet can provide.

morris hinson2

• When working wet-on-wet pull the brush along its length with the handle close to the surface. You get two strokes with a flat bristle brush, one side then the other, look at the brush for any paint it picked up and wipe it. Think of the brush hairs as if they were the fingers on your hand stroking the surface. This method allows wet paint to go over another (wet) color with clean results.

Using this technique have its advantages. One is you don’t need fine drawing skills. Blending is also quite easy in this technique so you don’t need extensive blending of colors. Lastly, your paintings can be completed quickly (about 2 hours to 2 days only) because you have to make sure that you’re working on wet paint.

This technique is quite advanced and requires a bit of painting experience. Using the Wet-on-Wet method, a dedicated practice and experimentation are all that is necessary to achieve masterpieces that you never imagined you can possibly do.

Paintings by Morris Hinson http://www.thumbartsguild.com/artist/mhinson.html

Learn the Oil Painting Technique: Blending

Color blending is a technique wherein two colors are combined to create another color. Each color has a separate blend factor that determines how much of each color is combined into the final product. There are different ways to blend colors and different ways with different medium. Today, I will share some techniques in color blending using oil paints.

blue_blend

How to start?
Once you’ve decided what colors you want to blend to create an effect, you might want to blend small amounts of each and check if it’s the color you’re looking for then you can make necessary adjustments. Move the brush in a way from one color into the other and back or in a zigzag motion. Wipe off any paint from your brush before you start blending or better yet, start with a clean, dry brush so you won’t add any extra paint that is not part of your color scheme.

Indigo sunset original oil painting, seascape  by Gina De Gorna
Indigo sunset original oil painting, seascape
by Gina De Gorna
Image source: http://sunsetartonline.com

How to blend on canvas?
You don’t want the colors mix equally so stroking your brush sideways at least initially or else you’ll have strips of concentrated colors in your blended color. Remember to keep your strokes short and picking different percentages of blending. Keep repeating until it blends. As your tip gets thinner you get a smoother result, and once is smooth enough you can use blur or smudge tool to finish the job in case you want perfect gradients. If you think your blended color is not blending well or it’s too concentrated on canvas, all you need to do is to pick up a little fresh paint in the color that’s at risk of being lost then work from the outside or the darker shade until its blended. You can take your time blending with oil paints because they dry slowly unlike with acrylic paints.

flat-brushWhat type of brush and brushstroke is best to use in blending?
Create a transition between the first two shades using a crosshatch stroke. Flat brushes tend to work best for blending. Smooth the blend by using parallel strokes along the transition you just created. The parallel strokes should be perpendicular to the lighter shades. Use a clean brush to blend the next shade, and repeat the technique using first crosshatched strokes followed by parallel stokes. A clean brush should always be used when working with a new shade, even if the actual color is the same.


Learn the Oil Painting Technique: Underpainting and Glazing

Underpainting

It is an initial layer of paint that will serve as a foundation and help define subsequent layers of paint for your painting. Underpaintings are usually monochromatic which reflects light through the over-painting layers and gives a painting the luminosity. There are several different methods of underpainting were used by the old masters.

umber5
underpainting


umbercomplete
underpainting effect

· Grisaille
Pronounced as “griz-eye” this is a method of underpainting with different gray paints.

· Verdaccio
It is a method of underpainting with colors of olive or green gray paint in the light areas. It often resembles a moonlight effect.

· Imprimatura
This underpainting method usually uses transparent layers of earth colors (ra umber or burnt umber). It is used as first stain to tone the canvas.

· Wash-in Underpainting
A variation of the Imprimatura underpainting. The subject or composition can be drawn into a thin semi-transparent layer of raw umber or burnt umber. Rags, paper towels and paint brushes are used to lift out the paint exposing the lights to illuminate the subject.

Glazing

Glazes can change the hue and texture of a surface. Drying time will depend on the amount and type of paint medium used in the glaze. Different media can increase or decrease the rate at which oil paints dry. Oil paits usually takes longer to dry. If a paint is too opaque, painters will add special media or a lot of medium to the paint making them more transparent for the purposes of glazing. Glazing has the strongest impact on showing middle tones and dark colours.

Reproduction of Girl with a Red Hat by Jan Vermeer
Glazed reproduction of “Girl with a Red Hat” original by Jan Vermeer

Here are some tips on how to glaze oil paintings.

· Begin the oil painting as usual by sketching and putting visual resources as necessary, but do so as though the painting were going to be complete in one layer.

· Once completely dry, after a week or so, begin the next layer of paint. The glazes will soften the colours and deepen the tones. Each “glaze” slightly modifies the colour of what has already been painted on the canvas. When you look at it the colours are automatically mixed optically giving a rich deep colour.

· Putting a little linseed oil into the oil paint will create a translucent colour. Oil paint comes in transparent, semi-transparent, and opaque and you will learn which is which the longer you paint with oils. All paint colours can be used as glazes, even opaque paints, used as glaze to paint mist or fog.

· Apply the oil paint glaze onto selected areas. A second layer of slightly darker colour will deepen the colour without changing it completely.

Image source: www.easy-oil-painting-techniques.org